Organisation
This section enables you to maintain organisation details.
It is important to remember that Jobs report to Jobs and then employees are placed in to Jobs.
On this screen, you will be asked which job reports to which job, and then add additional organisation reporting levels if required.
Prerequisites
Rules and Guidelines
- Fields that are marked with red asterisks (*) are mandatory.
-
In this section, we are asking about the reporting structure of your organisation. If you do not have one yet, there is no need for you to accomplish this. But if you want Holiday and Timesheet requests to be approved by a manager, then an approval hierarchy is required.
Field Information
Click this button for a graphical representation of the organisational hierarchy.
To see the employees in a position, select the dropdown and select Position Occupants. This will show you which employees report to which managers.
This field displays the position label.
Select the position number of the employee who directly supervises the employees belonging to that particular position.
Select the org unit ID or division for the job.
If you want a divisional hierarchy, you can set the division here. If there is no option yet, just click the Add button and enter the data. When you return, the data will be available in the dropdown.
Select the department code to be applied to the position.
If you want a departmental hierarchy, you can set the department here. If there is no option yet, just click the Add button and enter the data. When you return, the data will be available in the dropdown.
Link
If you would rather import the data from a spreadsheet, you can download our template by selecting this link. If it is the first time you have added any data, then a dummy row will be displayed to help you. If you already have data, then that data will be downloaded to enable you to update it as well as add new data. You will need to remove the dummy data entered in the spreadsheet before import.
Although the file will open in Excel, it is important that it is saved as a CSV (Comma Separated Values) file. Otherwise, the import will not be completed.
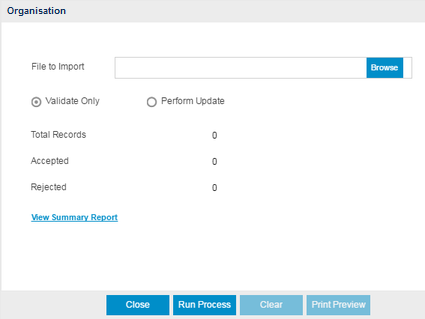
Upload will allow you to browse to the downloaded file and bring it in to the system.

You can either perform a validation or update the system once the file is located using the Browse option.
- Validate will advise you if you have any issue with the file before importing, enabling you to change the data. Select this option to test the format of the file and fields.
After running the Validate Only process, the system will produce a report detailing that the update is completed, and if there were errors encountered during the validation.
- Perform Update will upload the data and display it in the Organisation page of the Wizard for you to confirm by moving Next. Select this option to upload and update information in your database.
Select Next >> to continue with the workflow or Select Back >> to return.
Click this link --> Setup Wizard if you want to go to the Wizard's Help.